09 December 2008

Drawings/Model


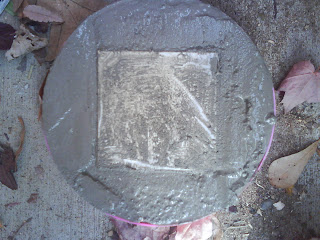
These are some of the drawings and models of my concrete structure. This also shows the model to scale of our building edge with our concrete structures placed in their given destination.

Concrete


At the beginning of this project, we started by gathering information on the parking lot. We then broke into smaller groups; mine being the building edge. We observed our area and made a "throw-up" drawing. We then gathered ideas on what we thought about creating with concrete. This structure is one of the four that my group came up with. This particular one was the one I helped create with Kathy. We made our mold and used bubble wrap for a texture. We then caste our concrete and came out with a 12 inch circle with a 6 inch square in the middle. We were very happy with the outcome, and ours did not crack so we left it as it was.

13 November 2008

Dialogue


It took me a couple tries before I knew for sure what I was going to do for the final project. My first idea was very simple and straight. I decided that I wanted to do something a little more complex and came up a better design. The folds within it gave it a different and unique look as well as upped the complexity. The new look created several different pathways, gave off different effects, and came together with unity and dialogue.


Rod and Plane Sketches


These were some of the sketches I did for the project. I realized that my model was much harder to draw than I thought.


Rough Drafts


Both of these were examples and rough drafts of how I got to my final project. I did not know what I was about to do or construct and basically played around with the skewers and paper.


09 October 2008

12 Rods and Planes


As I began this project, I had a lot of problems of producing a design using all 12 rods and all 12 planes. It took me several different tries to decide how and what I was going to do. My first attempt was very unorganized and did not use all the materials that were necessary. As I kept working on it, I came up with a similar idea to my final project, but then decided that something else needed to be change because it did not satisfy me. The way I had the paper positioned on the rods bothered me, so I as I worked with it, I arranged the paper in the way it is on the final model. I felt like this gave a good view from top, bottom, and side. It produces spaces within the paper, as well as within the rods. They are all connected to one another and hold each other together forming unity. This is how I decided that my final model would work for the final presentation.

06 October 2008

Unity: Compare & Contrast

As I looked around the critique room today, many of the projects captured my eye. I saw a lot of unity and a lot of different ideas and techniques. One that I found that stood out to me was Kalani’s. It reminded me of the Shell that I have previously learned about in Patrick’s class.

It is obvious that Kalani’s and mine differed in appearance in the fact that his was more rounded and curved. Mine on the other hand is more straight and direct. It has flat planes instead of curved ones. They also differ because my skewers are very parallel. Kalani’s skewer’s are a little more tilted and do not exactly lay parallel to the one another.

In comparison, there are spaces made within both of our projects. In Kalani’s project, there are definite spaces that are formed between the sheets of Bristol board, as well as with mine. Patterns are achieved by this, but also with the use of the sticks. I believe that both of our projects show a lot of care and precision. They appear that each skewer and each sheet of Bristol board were positioned according to their perfect place within the project. The sizes and how much space is revealed was also a concept that appears to had been carefully thought about.

30 September 2008

10 Minute Sketches


We took ten minutes on each drawing using a view finder. We drew the same thing three times from different views. It got very tiring after a while...

Pictorial Systems

So far, I am really enjoying drafting. I think it's going to be what I like best actually.

12 Twigs...Final One.

As I produced my final model, I was satisfied with the way it turned out. I first started with regular paper and shaping the paper and twigs in such a way of a hut. I then did something still a little similar to that and except took the sides out to an angle, placing the twigs along them to create a "canoe" look. Once we kept going over models and projects in class, I realized that I was doing more building with my sticks rather than making a place for them. This is how I came up with this final idea.
In the beginning, I started out with cardboard. I also did not have the flat plane underneath the twigs. I felt as if the cardboard was not as sturdy as I wanted it to be, so I switched to foam board. This was very sturdy and was neat and clean with no access bending or creases. I chose the certain color of the board and used both the colored side and the white side to create more of an effect to the twigs. The colored side was a lighter shade of the color of twine I used to hold the twigs together. Using both the colored and white side gave more energy to the project. I also chose these particular 12 twigs, because they were somewhat straight and were very smooth in texture. They reminded me of the smooth surface that was also on the foam board. I then added in the flat plane under the twigs to highlight and signify the twigs more. The plane was 12 inches which was also the same length of my 12 twigs.
This final model that I produced was very satisfying to me and also pleasing to the eye. It reminded me of a bridge, which I used for my final precedent as well. I created a place for my 12 twigs instead of building with them.




23 September 2008

Light Fixtures

2008-09-23
In this assignment, we had to draw three different light fixtures three times, in three different perspectives. The first one on the top left corner was my toughest one that I did, and the one I spent most of my time on. It was done far away, so there was a lot of detail to capture. I then learned to get closer to the object so get what I needed in a shorter amount of time.

22 September 2008

Precedent #2


This is my new precedent for my Twig project. My project reminds me of a wooden bridge. It is made of sticks (wood) just like the bridge in the picture. They are also both located where something is able to be beneath it. Theyboth have good structure to them and they fit in their place. There are also decorative pieces to enhance the main center piece. In the picture, it is the rocks. In my design, it is ribbon that hold the sticks together.

Lettering: Quotes


These are famous quotes that we had to write for a lettering assignment. I enjoy doing lettering and think that the assignments really help with technique.

Lettering: Lyrics


In this lettering assignment we had to write our favorite lyrics. These lyrics are by 3 Doors Down, Your Arms Feel Like Home.

Lettering: Lyrics


In this lettering assignment we had to write our favorite lyrics. These lyrics are by 3 Doors Down, Your Arms Feel Like Home.


2008-09-16

These are my hands that I drew for a homework assignment. I drew my left hand with my right hand and my left hand with my right.

Boots

2008-09-16
We drew rainboots in class oneday because everyone was wearing them since it was raining outside. They displayed them on a table in the center of the room and this is the angle I was sitting to draw them.

3 Architectural Hardwares


2008-09-16


This is an assignment we did in class. We had to draw 3 different pieces of architectural hardware and draw them using three different sketching techniques. I used contour, cross contour, and negative space shading.

2nd Graphic for Twigs


2008-09-17
This is my final graphic that i did for my 12 Twigs. This resembles more of what my final product will look like. I have changed a few things and have also added some pieces to it.